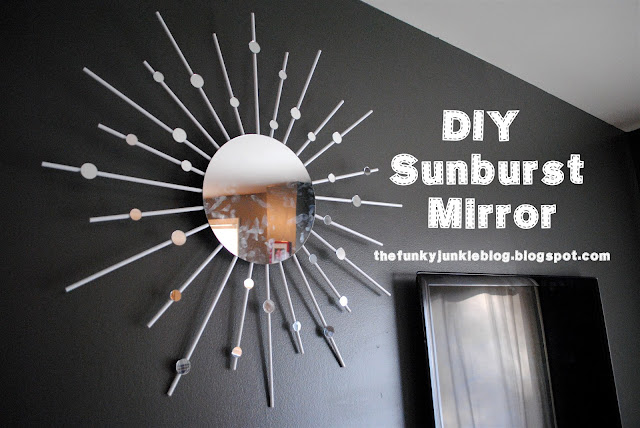
Wasn't I just saying I was going to be a blog that is more than just outfits and DIY's? Well, for my first real post of the year I have a little project that I whipped up after some inspiration from not only Pinterest, but from NOT wanting to pay a crazy amount of money for a decoration I have had my eyes on ever since moving into our new home.
I love the look of retro sunburst mirrors, and knew that it would make a great statement on our dark living room walls. However, what I don't love is the price tag attached to these things. I'm talking anywhere from $80 to $400+ for a real vintage sunburst mirror, not even factoring in shipping! Oh, the horror!
I thought they seemed easy enough to make, and with a little bit of guidance from a few different blogs, I came up with my own sunburst mirror for the wall at a miniscule fraction of the price you would pay at a store.
First things first, here's what you're going to need:
(All supplies from Joann Fabrics)
1 round craft mirror (I used 10")...$4.99
1 round wooden plaque...$1.79
12''x1/4'' wooden dowel rods (10 in a bag) @ .99 ea...$2.97
Small round glass mirrors (varied sizes) @$1.99 ea...$3.98
Sawtooth hangers...$2.49
Gorilla glue...~8.00
White spray paint...already had at home, but is $6.49 at Joann's
You will also need a hot glue gun and a hammer.
TOTAL: $30.71
**Note: I'm sure you can get most of this stuff for even cheaper at Walmart or another store....but I had a Joann's gift card. :)
First, I set out my mirror and wooden rods just to play with how I wanted to arrange the rods. I went for a long-short pattern, but do whatever feels good. This way, you can also figure out how many rods you're going to need to paint.
Next, take those bad boys outside or to a well-ventilated area and spray paint the crap out of them. You'll probably need to do several coats to get them looking nice and bright.
Hint: I didn't prime or sand them first. It might be a less frustrating process if you do. Just sayin'. Also--round things that roll around are really hard to spray paint evenly.
The spray paint I used said it would be dry to the touch within twenty minutes, but I ended up letting them dry for at least an hour between coats, and then let it dry overnight after the final coat before attaching them to the mirror.
While they are drying, I made the wall mount. I took the wooden plaque and attached a sawtooth hanger to the back. The package of hangers came with tiny little nails that you can use to attach it.
Once the rods are completely dry, it's time to bust out the almighty hot glue gun.
Lay the painted rods out on the mirror again, because once you start gluing, you gotta act fast.
It's not going to look pretty on the back. Don't worry about it.
Hot glue dries remarkably fast, so once you get them all glued down let them sit for a few moments.
Now, flip it over! You're almost done!
Now, attach the little round mirrors to the front of the rods in any pattern you would like.
While these are drying, prep the wooden disc to attach to the back of the mirror. When using Gorilla Glue, the wooden surface needs to be wet lightly with a paper towel. I drizzled a very light covering of glue on the side of the disc without the hanger before attaching it to the back of the mirror.
The glue will set best with something heavy sitting on it, so grab some books or whatever you have near to rest on top for a solid hour or two.
And that's all there is to it! I'm still trying to find the perfect spot on the wall for it, but I had to hang it up right away to snap some photos. I am absolutely thrilled with how it turned out!
Don't forget to take some Windex to the smudgy mirror...
Don't you just love when things turn out?


Holy hot damn....that looks awesome. You need to be on IFB for this one. Love where you've hung it. Great job, Brenda. Worth the effort. dawn suitcase vignettes. great way to start your year. xoxo
ReplyDeletelooks great!
ReplyDeleteSeriously?? That is so awesome. I love it! I wish I had the patience for stuff like that. You did such a great job.
ReplyDeleteWOW! That mirror looks incredible! Totally inspired to give it a try. Can you share about how long it took to make?
ReplyDeleteYes! I spread it out over several days--I think I started on Saturday evening, and finished it up on Monday night, so it could easily be done over a weekend. The part that takes the longest is just waiting for the paint to dry.
DeleteYou know I've been coveting mirrors like this and for ages and was thinking of giving the DIY a try. Yours is definitely the cutest I've seen! LOVE this tutorial.. you may have been the final inspiration to give my own version a try.
ReplyDeleteNew follower.
P.S. Motorola Radio above is AMAZING! Your Dad-- what a good guy!
I finally made my starburst mirror today. I was inspired by yours. Thank you so much for this post!
ReplyDelete